The Do's and Don'ts of Sneaker Cleaning: Common Mistakes to Avoid

There are common mistakes that many people make when cleaning their sneakers, which can lead to damage rather than restoration. In this guide, we'll explore the do's and don'ts of sneaker cleaning to help you keep your favorite pairs pristine.

The Do's:

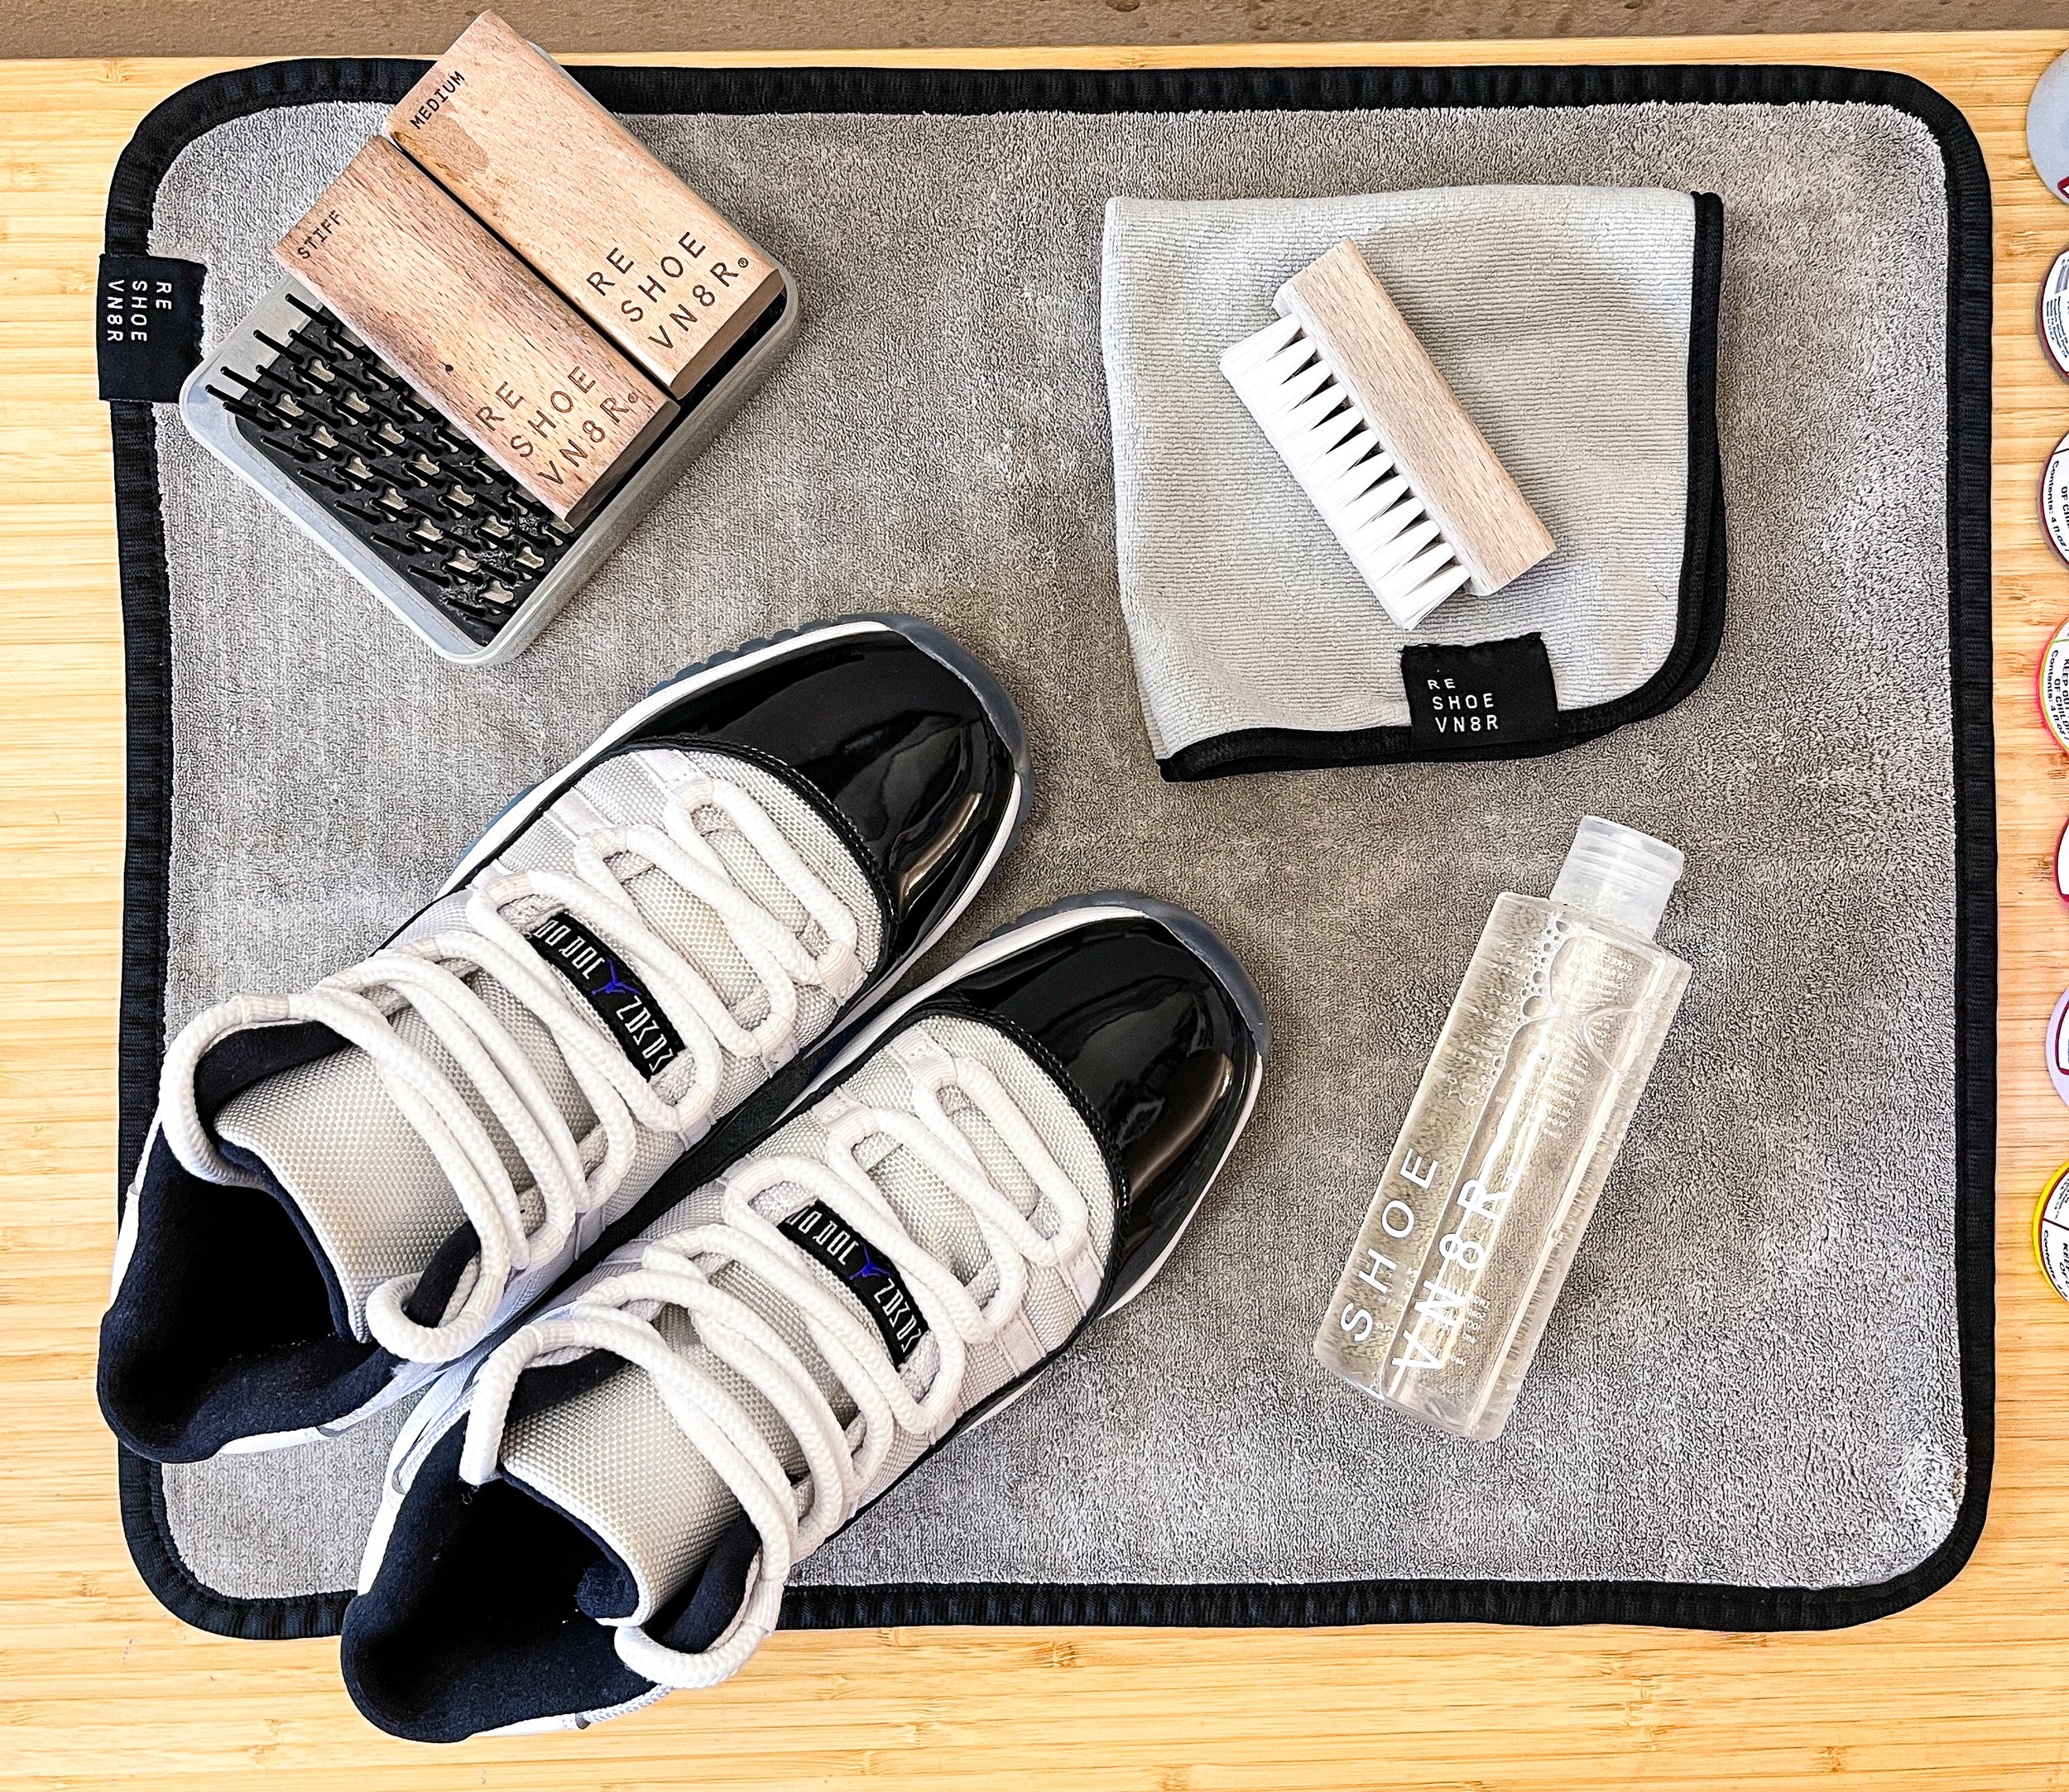
1. Do Use the Right Tools and Products:

  • Invest in a good quality sneaker cleaning kit that includes a soft-bristled brush, mild detergent or specialized sneaker cleaner, and a microfiber cloth.

  • Use a soft brush to gently scrub away dirt and stains without causing damage to the material.

2. Do Spot Test:

  • Before cleaning the entire shoe, spot-test the cleaning solution on a small, inconspicuous area to ensure it doesn't cause discoloration or damage.

3. Do Clean Regularly:

  • Regular maintenance is key to keeping sneakers looking fresh. Clean them after each wear, especially if they're exposed to dirt or mud.

4. Do Air Dry:

  • Allow your sneakers to air dry naturally after cleaning. Avoid putting them in the dryer or using direct heat, as this can cause damage to the materials.

5. Do Store Properly:

  • Store your sneakers in a cool, dry place away from direct sunlight when not in use. This helps prevent discoloration and deterioration of materials.

The Don'ts:

1. Don't Use Harsh Chemicals:

  • Avoid using bleach, strong detergents, or household cleaning products, as they can damage the fabric or finish of your sneakers.

2. Don't Soak in Water:

  • While it's essential to clean your sneakers, avoid soaking them in water for extended periods, especially if they're made of materials like suede or leather, as it can cause damage and deformation.

3. Don't Use Excessive Force:

  • Scrubbing too vigorously can damage the material of your sneakers, especially if they're made of delicate fabrics like suede or knit. Use gentle, circular motions when cleaning.

4. Don't Forget to Protect:

  • Consider applying water and stain-repellent spray to your sneakers after cleaning to provide an extra layer of protection against future spills and stains.

5. Don't Neglect the Soles:

  • Don't overlook cleaning the soles of your sneakers. Use a separate brush or sponge to scrub away dirt and grime from the outsole to maintain traction and prevent tracking dirt indoors.

Spotlight on Sneaker Materials: Cleaning Tips for Suede Sneakers

Suede sneakers have become a staple in the world of fashion, offering a luxurious and stylish alternative to traditional leather or canvas options. However, keeping these kicks clean and pristine can be a challenge, especially with the delicate nature of suede. Fear not! Our sneaker cleaning service is here to provide you with expert tips on maintaining the allure of your suede sneakers. Let's dive into the intricacies of suede and unveil the secrets to keeping them spotless.

Understanding Suede:

Suede is a type of leather with a soft and napped finish, crafted from the underside of animal hides. While it imparts a velvety texture to sneakers, it is highly susceptible to stains, scuffs, and water damage. Proper care is essential to ensure your suede sneakers maintain their aesthetic appeal.

Preventive Measures:

  1. Waterproofing: Begin by applying a suede protector spray before wearing your sneakers. This acts as a barrier against water and stains, reducing the likelihood of permanent damage. Repeat this process every few weeks for optimal protection.

  2. Avoiding Wet Conditions: Suede and water are not the best of friends. Whenever possible, avoid wearing suede sneakers in wet conditions. If caught in the rain, let your sneakers air-dry naturally instead of using heat sources, which can cause the material to lose its texture.

Cleaning Techniques:

  1. Brushing: Invest in a soft-bristled suede brush to gently remove surface dirt and revive the nap. Brush in one direction to maintain the suede's original texture. For stubborn stains, a small amount of white vinegar on the brush can be effective.

  2. Eraser Method: For scuff marks and light stains, use a suede eraser or a standard pencil eraser. Gently rub the affected area to lift the stain. Remember to brush the area afterward to restore the suede's texture.

  3. Steam Cleaning: Steam is a gentle yet effective way to remove tough stains from suede. Hold the sneakers over steam, being cautious not to get them too wet. Once the stains have softened, use a suede brush to restore the texture.

Professional Cleaning:

Despite your best efforts, some stains may prove challenging to remove at home. In such cases, entrust your suede sneakers to professional sneaker cleaning services. Professionals have the expertise and tools to tackle even the most stubborn stains, ensuring your suede sneakers look as good as new.

Seasonal Sneaker Care Tips: Winter Edition

As winter arrives, sneaker enthusiasts face a unique set of challenges in maintaining the pristine condition of their beloved footwear. Harsh weather conditions, salted sidewalks, and damp environments can take a toll on your sneakers. To help you keep your kicks looking fresh, we've compiled a comprehensive guide with seasonal sneaker care tips tailored specifically for the winter months.

  1. Prevention is Key: Weatherproof Your Sneakers Before heading out into the winter wonderland, take preventive measures to shield your sneakers from the elements. Apply a quality sneaker protector spray to create a protective barrier against water, snow, and salt. This simple step can go a long way in preserving the material and color of your favorite sneakers.

  2. Choose the Right Sneakers for the Weather: Consider the type of sneakers you wear during winter. Opt for models with water-resistant or waterproof materials. High-top sneakers or those with additional insulation can provide extra warmth and protection against cold temperatures. Investing in winter-ready sneakers is a proactive approach to maintaining their condition.

  3. Regular Cleaning Routine: Establish a regular cleaning routine to prevent dirt and grime from accumulating. Brush off any loose dirt and wipe your sneakers with a damp cloth after each wear. This helps to remove salt and other contaminants that can cause long-term damage to the material.

  4. Deep Cleaning Sessions: Schedule deep cleaning sessions for your sneakers during the winter months. Use a gentle sneaker cleaning solution and a soft brush to scrub away stubborn stains. Pay extra attention to areas that are more prone to dirt buildup, such as the soles and crevices. Allow your sneakers to air dry thoroughly after cleaning.

  5. Drying Techniques: Wet sneakers are susceptible to mold and unpleasant odors. After braving the winter elements, make sure to dry your sneakers properly. Avoid using direct heat sources like radiators, as excessive heat can damage the materials. Instead, stuff your sneakers with newspaper or use a shoe tree to help maintain their shape and absorb excess moisture.

  6. Rotate Your Sneaker Collection: Give your sneakers some time off by rotating your collection. Wearing the same pair every day can lead to quicker wear and tear. By allowing your sneakers to rest, you give them a chance to breathe and maintain their structural integrity.

  7. Emergency Stain Removal: Accidents happen, especially during the unpredictable winter weather. If you encounter a stain, address it promptly. Carry a small stain removal kit with a mild cleaning solution for on-the-go touch-ups.

How to Clean White Sneakers and Keep Them Looking Pristine.

If you've ever owned a pair of crisp white sneakers, you know the struggle of keeping them looking as fresh as the day you unboxed them. Fear not, because we've got your back with some tried-and-true tips on how to clean your white kicks and maintain that pristine look. Whether you're a sneaker aficionado or just someone who loves rocking clean shoes, read on for the ultimate guide to keeping your white sneakers spotless!

Step 1: Gather Your Supplies
Before diving into the cleaning process, make sure you have the right tools on hand. You'll need a soft brush, a gentle detergent, a toothbrush, a soft cloth, and, if necessary, a specialized sneaker cleaning solution. Remember, the key here is to be gentle to avoid damaging the material.

Step 2: Remove Loose Dirt and Debris
Start by knocking off any loose dirt or debris from your sneakers. Give them a good shake or use a soft brush to remove dirt from the outsoles and crevices. This simple step can prevent dirt from scratching the surface during the cleaning process.

Step 3: Wipe Down the Surface
Dampen a soft cloth with water and gently wipe down the entire surface of your sneakers. This will help remove any surface-level dirt and prepare the shoes for a deeper clean. Be sure to use a clean section of the cloth as you go to avoid spreading dirt around.

Step 4: Mix a Gentle Cleaning Solution
Create a cleaning solution by mixing a small amount of mild detergent with water. Avoid using harsh chemicals or bleach, as they can damage the material and strip away color. A few drops of dye free dish soap in a bowl of water should do the trick.

Step 5: Scrub with a Soft Brush
Dip a soft brush or into the cleaning solution, and gently scrub the sneakers in circular motions. Pay extra attention to any stained or discolored areas. Don't forget to scrub the soles and any rubber or plastic components.

Step 6: Rinse and Repeat
After scrubbing, wipe off the excess cleaning solution with a microfiber towel. If needed, repeat the process until your sneakers are spotless. Be patient – it's better to take your time and achieve a thorough clean than rush through the process.

Step 7: Air Dry and Protect
Allow your sneakers to air dry naturally. Avoid exposing them to direct sunlight or using a heat source, as this can cause the material to crack or discolor. Once dry, consider applying a water and stain repellent to protect your sneakers from future spills and stains.

Expert Tips on Cleaning Leather Sneakers

In the dynamic world of sneakers, where style meets comfort, the material plays a pivotal role in determining the overall aesthetic and durability of your favorite kicks. Among the diverse range of sneaker materials, leather stands out as a classic choice, exuding timeless elegance. In this blog post, we'll shine a spotlight on the art of maintaining and cleaning leather sneakers, ensuring they remain in top-notch condition. Whether you're a sneakerhead or just someone who loves their stylish footwear, these expert tips will keep your leather sneakers looking as fresh as the day you bought them.

  1. Understanding Your Leather: Before diving into the cleaning process, it's crucial to understand the type of leather your sneakers are made of. Different leathers require different care routines. Full-grain leather, for example, may need gentler treatment than suede or patent leather. Take a moment to identify the specific type of leather your sneakers feature, as this knowledge will guide your cleaning approach.

  2. Gentle Cleaning Solutions: When it comes to cleaning leather sneakers, the mantra is "gentle is better." Harsh chemicals and abrasive tools can damage the material, causing it to lose its luster and suppleness. Opt for mild cleaning solutions, such as a mixture of water and a small amount of gentle soap or a specialized leather cleaner. Apply the solution using a soft cloth or a soft-bristled brush to avoid scratching the surface.

  3. Spot Cleaning for Stains: Stains are inevitable, especially for those who wear their sneakers regularly. To tackle stubborn stains on leather, create a paste using baking soda and water. Gently apply the paste to the stained area, allowing it to sit for a few minutes before wiping it away with a damp cloth. This method is effective for various types of stains, from mud to ink, without causing harm to the leather.

  4. Conditioning for Longevity: Just like your skin, leather needs hydration to stay healthy. Regularly applying a high-quality leather conditioner will prevent the material from drying out and cracking. This step is particularly important if your sneakers have been exposed to harsh weather conditions. Conditioning not only restores moisture but also enhances the natural sheen of the leather.

  5. Protection Against the Elements: Prevention is key when it comes to maintaining leather sneakers. Invest in a water repellent spray specifically designed for leather to create a protective barrier against moisture. This simple step will safeguard your sneakers from rain, spills, and other environmental factors, extending their lifespan and keeping them looking pristine.

Leather sneakers have a timeless appeal, and with the right care, they can remain a staple in your wardrobe for years to come. By understanding your leather, using gentle cleaning solutions, spot cleaning for stains, regular conditioning, and providing protection against the elements, you can keep your favorite kicks looking as good as new. Follow these expert tips, and let your sneakers make a statement every step of the way. Elevate your sneaker game by giving your leather sneakers the care they deserve!

Sneaker Protection: Stain Repellents and Waterproofing

Protecting your sneakers with stain repellents and waterproofing can help extend their lifespan and keep them looking fresh. Here are some tips and steps to effectively protect your sneakers:

Stain Repellents:

  1. Choose the Right Product:

    • Look for a reputable stain repellent specifically designed for sneakers.

    • Consider the material of your sneakers (leather, canvas, mesh, etc.) and choose a product suitable for that fabric.

  2. Clean the Sneakers:

    • Before applying the stain repellent, make sure your sneakers are clean. Remove any dirt or stains with clear (dye free) soap and a soft brush or microfiber towel..

  3. Read and Follow Instructions:

    • Carefully read the instructions on the stain repellent product. Different products may have varying application methods and drying times.

  4. Apply Evenly:

    • Hold the spray at a distance recommended in the instructions and apply the repellent evenly over the entire surface of the shoe.

  5. Allow Drying Time:

    • Let the sneakers dry completely before wearing them. This may take a few hours, so be patient.

Waterproofing:

  1. Clean First:

    • Clean your sneakers thoroughly before applying a waterproofing spray. Remove any dirt or debris.

  2. Choose the Right Product:

    • Select a waterproofing spray suitable for the material of your sneakers. There are specific products for leather, suede, and other materials.

  3. Apply Evenly:

    • Hold the spray at the recommended distance and apply an even coat. Pay special attention to seams and stitching.

  4. Allow Drying Time:

    • Give the waterproofing spray enough time to dry. This is crucial for the product to form a protective barrier.

  5. Apply Multiple Coats:

    • Depending on the product, you may need to apply multiple coats for effective waterproofing. Follow the instructions on the product label.

  6. Reapply Periodically:

    • Waterproofing is not a one-time process. Reapply the spray periodically, especially if you notice that water is no longer beading on the surface of your sneakers.

General Tips:

  • Ventilation is Key:

    • Apply these products in a well-ventilated area to avoid inhaling fumes.

  • Test in an Inconspicuous Area:

    • Before applying any product to the entire sneaker, test it in a small, inconspicuous area to ensure compatibility and to check for any adverse reactions.

  • Follow Manufacturer Guidelines:

    • Always follow the care and maintenance guidelines provided by the manufacturer of your sneakers.

Product recommendation:

Here at Weekend Ritual we use Reshoevn8r stain and water repellent. We recommend this product because it’s two products in one (stain and water repellent), so no need to buy and use two seperate products. Also, the Reshoevn8r stain and water repellent is safe to use on all sneakers and materials.

By taking these steps, you can help protect your sneakers from stains and water damage, keeping them looking new for a longer period.

DIY Sneaker Cleaning Hacks with Household Items!

If you're anything like us, you know that a clean pair of sneakers can elevate your entire look. Whether you're rocking your favorite kicks on the street or hitting the gym, keeping your sneakers in tip-top condition is a must. But fear not, because we've got your back with some super easy and budget-friendly DIY sneaker cleaning hacks using household items!

1. Baking Soda Bliss

Got stubborn stains on your sneakers? Baking soda is here to save the day! Mix a tablespoon of baking soda with warm water to create a paste. Apply it to the stains using an old toothbrush and let it sit for about 15 minutes. Wipe away the paste with a damp cloth, and voila! Your sneakers will be stain-free and smelling fresh.

Pro Tip: Sprinkle a little baking soda inside your sneakers to neutralize odors.

2. Toothbrush Magic

Say goodbye to scuff marks with the help of an old toothbrush. Wet the bristles, add a few drops of clear (dye free) dish soap, and gently scrub away those pesky marks. The soft bristles won't damage your sneakers but are tough enough to remove most scuffs. For extra stubborn spots, add a pinch of salt to the mix for added abrasion power.

Pro Tip: Use a spare toothbrush to reach those tight spaces around the shoe sole.

3. Vinegar Victory

White vinegar is a superhero when it comes to cleaning, and your sneakers are no exception! Mix equal parts white vinegar and water in a spray bottle. Give your sneakers a light spritz and wipe them down with a cloth. This not only cleans but also helps kill bacteria and eliminates funky odors.

Pro Tip: Place a bowl of white vinegar in your closet to keep your sneakers smelling fresh all the time.

4. Dish Soap Delight

Sometimes the simplest solutions are the best. Mix a few drops of clear (dye free) dish soap with warm water to create a soapy solution. Dip a sponge or cloth into the mixture and gently scrub your sneakers. It's effective, easy, and you probably already have dish soap in your kitchen!

Pro Tip: Opt for a clear dish soap to avoid any potential staining on your sneakers.

5. Dryer Sheet Dream

Not just for your laundry, dryer sheets can also work wonders on your sneakers. After cleaning, tuck a dryer sheet into each shoe to keep them smelling fresh and combat static. It's an easy way to extend the post-cleaning freshness!

Pro Tip: Replace the dryer sheets regularly for continuous freshness.

There you have it – five DIY sneaker cleaning hacks using items you probably have lying around the house. Keep those kicks looking fly without breaking the bank! And hey, if you ever need a professional touch, don't hesitate to reach out to book a sneaker cleaning with us. We've got the expertise to make your sneakers sparkle.

Remember, a clean pair of sneakers is a happy pair of sneakers!

COMMON SNEAKER STAINS AND HOW TO REMOVE THEM

If you're anything like us, you've probably had your fair share of heart-stopping moments when your favorite kicks fall victim to stubborn stains. Fear not, because we've got your back! In today's blog post, we're dishing out the inside scoop on common sneaker stains and the magic tricks to make them disappear. Get ready to step out with confidence in your spotless sneakers!

  1. Grass Stains – Nature's Signature: Whether you're a weekend warrior on the soccer field or just enjoying a leisurely stroll in the park, grass stains can be a real buzzkill. Fear not! Mix a tablespoon of baking soda with warm water, create a paste, and gently scrub away those green invaders. Your sneakers will thank you for the spa treatment.

  2. Mud Messes – Taming the Wild Outdoors: Mother Nature loves to play dirty, and mud-covered sneakers are her signature artwork. Let your kicks dry completely, then knock off the dried mud with a soft brush. Mix a small amount of clear (dye free) detergent or dish soap with water, apply it with a microfiber towel, and watch the mud disappear. Ta-da! Your sneakers are back to their glory days.

  3. Coffee Calamities – Perk Up Your Kicks: We've all been there – that accidental coffee spill that turns your pristine sneakers into a caffeinated catastrophe. Act fast! Dab the stain with a clean cloth to soak up excess liquid, then mix equal parts vinegar and water. Gently blot the stain until it fades away, and you'll be back on your feet in no time.

  4. Ink Incidents – Oops, I Did It Again: Whether it's a pen mishap or a rogue marker, ink stains can be a nightmare. Reach for the trusty rubbing alcohol and a cotton ball. Dab, don't rub, the stain until it lifts. For stubborn spots, repeat the process until you've reclaimed your sneakers from the clutches of ink.

  5. Sauce Spatters – Conquer the Condiments: Barbecue sauce, ketchup, or any saucy mishap – we've all been there. Start by scraping off excess sauce with a dull knife or spoon. Mix a teaspoon of clear (dye free) dish soap with warm water and use a microfiber towel to gently scrub away the stain. Your sneakers will be as good as new, and you'll be ready for the next cookout!

Life happens, and stains are inevitable. That's where our expert sneaker cleaning experts come in. Give your sneakers the VIP treatment they deserve, and let us handle the tough stuff stains. Ready to give your sneakers a makeover? Contact us today for expert cleaning and restoration. Because your sneakers deserve the best!

FIRST LOOK AT NEW BALANCE "BORO PACK"

Initial images have emerged showcasing New Balance's upcoming "Boro Pack," featuring the 550 and 580 shoe models.

The "boro" technique, originating in rural Japan around the 1850s, was initially devised by farmers for clothing repairs and winter insulation. This method involved the intricate layering of patchworked cotton or hemp, utilizing salvaged materials, as they were highly prized during that period.

New Balance's 550 and 580 models are not the first from the brand to undergo the boro treatment. Previously, independent brands and designers like Rifare, ANT KAI, M.ATO, and others have applied this technique to models like the 2002R.

Regarding New Balance's official exploration of the boro technique in the "Boro Pack," it showcases meticulous detailing and a combination of various indigo shades and textures. These panels are meticulously arranged, reminiscent of the hand-sewn methods commonly associated with boro, featuring exposed white stitching.

Each pair within the collection incorporates a wide array of materials, including soft suede, hairy suede, pre-aged suede, denim, woven canvas, and, in the case of the 550s, cracked leather.

Based on the initial preview, the New Balance Boro Pack 550 and 580 are expected to hit the market sometime in November, though pricing and distribution details have yet to be disclosed as of the current writing.

Thinking of copping a pair of these? Keep them clean and maintained with a Weekend Ritual sneaker cleaning!

NEW LOEWE AND ON COLLAB

"LOEWE, the renowned Spanish luxury brand, has claimed the title of the world's trendiest brand in 2023. The brand, backed by Jonathan Anderson, continues to make waves with a series of captivating collections. In their latest collaboration, LOEWE partners with the up-and-coming label, On. Their previous collaboration produced performance wear and unique versions of the On Cloudventure and Cloudrock.

For the Fall/Winter 2023 season, they introduce a brand-new design together called the Cloudtilt. This lifestyle-oriented creation combines On's CloudTec Phase cushioning with LOEWE's vibrant color palette. The LOEWE logo embellishes the right side of each shoe, also appearing on the tongue tag, sockliner, and the heel tab of the right shoe in various colorways. They've prepared seven monochromatic styles: "All White," "Lime Green," "Purple Rose," "Forever Blue," "All Navy," "Khaki," and "All Black."

The entire LOEWE x On Cloudtilt collection is set to launch on October 12 through LOEWE and On. Each pair is priced at $490 USD, with "Purple Rose" and "All Navy" exclusive for women and "Forever Blue" and "Khaki" as men's exclusives."